Sunday, December 23, 2012

The Pecan Lemon-Curd Kiss, a new holiday favorite

 It's the most wonderful time of the year for the holiday cookie! Sure, you can walk down the street and see the twinkle of holiday lights strung along people's balconies and lights illuminating entryways to apartment buildings.  The scent of pine will linger at the corner where Christmas Trees, garlands and wreaths are sold, but the best thing about the holidays is seeing and smelling a tray of homemade cookies coming out of the oven.  The most wonderful time of year mean delicious treats homemade with love that will bring bring smiles to faces.

Making and giving holiday cookies is what I like to do.  From the moment the mixer is placed on kitchen counter until the last batch of cookies is pulled from the oven, boxed and ready to give, the mixer remains at attention like a solider waiting for the next cookie to prep.  This year's cookie sampler features the traditional, the reinvented and a new favorite.  The traditional in the form of a sugar cookie with colorful sanding sugar baked on top and cut into shapes of snowflakes, stockings and Christmas trees.  Taking a cue from the candy cane, the chocolate chip cookie received a jolt of holiday flavor -- pieces of peppermint candies. The classic Black & White cookie found a colorful new red velvet bottom and the Linzer Heart cookie was cut into flowers.  Yet while I do love all of the cookies I've made, I do have a new favorite: The Pecan-Lemon Curd Kiss, a  spin on the classic pecan sandy and when Santa comes calling to my house, he'll definitely sit down for this treat!
It's a classic cookie with chopped pecans added to the other dry ingredients and finely ground. Added to the goodness of butter and sugar that's been blended to a light and fluffy state combined with an egg yolk and fragrant vanilla, the cookie is ready for the lemon curd.  I actually enjoy making my own lemon curd; however, this time I did cave in and purchased a good store variety.  If you like the sweet-tart bite of smooth lemon curd and the subtle, soft crunch of a crumbly cookie, this is for you!

Recipe adapted from America's Test Kitchen Christmas Cookies
Makes 2 Dozen Cookies
1 cup (5 ounces) all-purpose flour
3/4 cup Pecans
Pinch of salt
8 tablespoons unsalted butter, softened
1/2 cup (2 1/2 ounces) granulated sugar
1 large egg yolk
3/4 teaspoon vanilla extract
1/4 cup lemon curd
Confectioners' Sugar

1. Adjust oven racks to the upper-middle and lower-middle position in your oven.  Preheat oven to 350* and line two baking sheets with Silpats or parchment paper.
2. Into a food processor add the pecans, flour and pinch of salt and process for approximately 45 seconds.  In a stand mixer with a paddle, cream the butter and sugar until light and fluffy, about 3-6 minutes.  Add the egg yolk and vanilla and mix-in until well incorporated.  Reduce the speed and slowly add the flour mixture until just combined.
3. Using a small melon-ball scoop or small ice-cream scoop and scoop out dough into balls (approximately 1 tablespoon) and space them 2 inches apart on the baking sheets.  Using the rounded side of a teaspoon, make a small indentation into the center of each cookie and bake until just set, about 10 minutes.
4. Remove the cookies from the oven and gently reshape the indentation.  Fill each indentation with a 1/2 teaspoon of lemon curd.  Bake until the cookies are just beginning to brown around the edges, 8-10 minutes, switching and rotating the baking sheets halfway through baking.  Let the cookies cool on the baking sheets for 5 minutes.  Transfer the cookies to a wire rack and let cool completely, about 45 minutes.  Dust the cookies with confectioners' sugar before serving.

Friday, November 2, 2012

Baked Pumpkin Donuts


As Hurricane Sandy was getting ready to pummel the east coast, all the news outlets were telling us to prepare and make sure we have flashlights and batteries as well as a good supply of food and water. I was completely prepared -- I had a flashlight that also was a radio and worked as a light beam, I also had additional flashlights and batteries in case a neighbor needed one.  I was well stocked with non-perishable foods, I had many gallons of water, and yes, Scout the Dog, Miss Mimi and Luna the Cat were set with their staples.  Yet something was missing.  Standing in front of my pantry shelves reviewing what was there, the cans of pumpkin puree came right into my vision line.  Hmmm, if the power were to go out, having a comforting treat or two might help with the blow.  When I came upon a recipe for Baked Pumpkin Donuts it was obvious what was next!  A quick trip to Sur La Table, two donut pans later, and  it was "time to make the donuts!"  Besides tasting yummy, baking donuts is so simple!  The following recipe was found on the King Arthur Flour website. 
  Baked Pumpkin Donuts
Makes 12-14 donuts  
1/2 cup Vegetable Oil
3 Large Eggs
1 1/2 cups Sugar
1 1/2 cups Canned Pumpkin
1 1/2 teaspoons Pumpkin Pie Spice 
(if you don't have, you can use: 3/4 tsp cinnamon & 1/4 tsp each nutmeg and ground ginger)
1 1/2 teaspoon Salt
1 1/2 teaspoon Baking Powder
1 3/4 cups All Purpose Flour

Preheat Oven to 350*

Put the first 7 ingredients into a mixer and blend until smooth.  
Slowly add the flour, stirring until smooth.
Spray two (2) donut pans with Baker's Joy or a similar non-stick spray.  Fill each space 3/4 full with the batter -- using a tablespoon ice-cream scoop makes this easier.
Bake for 15-18 minutes or until a cake tester comes out clean.  Remove and let the donuts stand for 5-minutes until the edges loosen.
** if you want to make these as muffins, please bake for 23-25 minutes.

Monday, October 1, 2012

Cream Cheese Filled Pumpkin Muffins

It's officially pumpkin season! I decided to usher in the season by making Cream Cheese Filled Pumpkin Muffins from Marlene Koch's Eat More of What You Love each averaging only140 calories per muffin, a whopping 70% less calories then the pumpkin muffin at your favorite coffee establishment which has roughly 490 calories!  The below recipe will yield 12 muffins.

INGREDIENTS:
1/4 cup plus 2 tablespoons less-fat, tub-style cream cheese
2 teaspoons powdered sugar
4 teaspoons plus 3/4 cup granulated sugar baking blend sweetener (i.e. Splenda), divided
1 3/4 cups all-purpose flour
1 1/2 teaspoons baking powder
1/2 teaspoon baking soda
2 teaspoons cinnamon
1 teaspoon ginger
1/4 teaspoon cloves
1 large egg
2 large egg whites
3/4 cup canned pumpkin
1/3 cup unsweetened applesauce
3 tablespoons canola oil
2 tablespoons molasses

 DIRECTIONS:
 Preheat oven to 375*.  Line 12 muffin cups with liners.

In a small bowl, blend the cream cheese, powdered sugar and 4 teaspoons of sweetener.  Mix thoroughly and then set aside.  In a medium bowl, whisk the next six (6) ingredients - flour through cloves.

In a medium bowl, with an electric mixer, beat the 3/4 cup sweetener, egg and egg whites for 3-4 minutes, or until doubled in volume.  Turn the mixer to low, and blend in the pumpkin, applesauce, oil and molasses.  Using the large spoon, stir in the flour mixture just until the dry ingredients are combined.

Spoon into each muffin cup, 3 tablespoons of batter.  Make an indent into each each muffin and spoon in a heaping teaspoon of the cream cheese mixture into the batter.  Top each muffin with another tablespoon of batter, spreading it to cover most of the cream cheese. (Note: don't worry if you don't have any extra batter).

Bake for 18-20 minutes or until the center springs back when lightly touched.  Cool for 5 minutes before moving muffins to a wire rack for complete cooling.


Wednesday, September 19, 2012

Maple Apple Muffins


I'm hoping Fall has finally arrived, because I'm ready to bring out my scarves and even a sweater or two.  The crisp air reminds me of that first bite of an apple and apple-picking time is here!  Now while I've yet to go apple picking, I do have plenty of apples which recently came in handy for the wonderful Maple Apple Muffin recipe I came across on the DailyMeal website.  While the recipe calls for "ground cardamon," I could find it; I did have cardamon pods but removing their skins, then grinding them was something I didn't want to do.  I swapped out the ground cardamon for Pumpkin Pie Spice which worked perfectly.  The choice of apple is up to you but I like an apple that can hold up while being cooked, such as Honeycrisp or Granny Smith.

INGREDIENTS
1/4 cup unsalted butter
1/4 cup vegetable oil
1/2 cup brown sugar
2 tablespoons maple syrup
1 egg
2 apples, cored, peeled and grated or cut into small pieces
1/4 teaspoon cinnamon
1/4 teaspoon pumpkin pie spice
1/4 teaspoon ground cloves
2 teaspoons vanilla extract
1/4 teaspoon salt
1 cup all-purpose flour
1 cup quick-cooking oats
1/4 teaspoon baking soda
1/2 cup chopped walnuts (optional)

DIRECTIONS
Preheat the oven to 400*
Using an electric mixer, cream together the butter, oil, brown sugar and maple syrup.
Add the egg and whisk until combined.  Add the grated apples, cinnamon, pumpkin pie spice, cloves, vanilla extract and salt. Combine flour, oats and baking soda and gradually mix into the wet mixture.  Mix until combined and fold in the walnuts.
Line a muffin tray with liners and fill each 1/4 full.  Bake in the oven and after 10-minutes, reduce the temperature to 380*.  Continue baking until a tester comes out clean from the center of each muffin.

Sunday, September 2, 2012

Homemade Gnocchi

homemade gluten-free gnocchi sauteed with mushrooms and tomatoes

I'm not sure why I was nervous about making gnocchi.  Maybe because if not made well the wonderful little pillows could be dense lumps resulting in an awful mess!  My nervousness subsided thanks to a new client, cookbook author Kim McCosker and her 4 Ingredients brand (see more of Kim's ideas at her Pinterest Page http://pinterest.com/4ingredients/).  I love simplicity and working with 4 or fewer ingredients is probably as simple as it comes.  Kim's recipe for gnocchi comes from her 4 Ingredients Gluten-Free cookbook and you don't have to have a gluten intolerance to enjoy the recipes.

1 1/2 cups gluten-free flour
1 cup ricotta cheese
1 egg yolk

Sift the flour, then add the ricotta cheese and the egg yolk and mix well (I used my hands to make sure the flour was completely absorbed into the ricotta and egg yolk).

Roll the mixture into 3/4 inch balls, then "pull" each piece of gnocchi with a fork making a roundish-long shape.

Bring a large pot of salted water to a boil then gently drop the pieces of gnocchi.  They will float to the top when ready.

You can also saute the gnocchi using olive oil and a non-stick pan.


Monday, July 23, 2012

The Anything and Everything Cookie


A good cookie recipe is meant to be shared. A good cookie recipe should be one of those "go to" recipes you can make on a dime.  It's a simple recipe that can be made ahead and when you do need to come up with something sweet in a jiffy, the dough is right there in the freezer waiting.  This spin on a classic chocolate chip cookie is what I call the "Anything and Everything Cookie," because I usually end up tossing in a lot more than chocolate chips!  They're chewy in texture, great with an ice cold glass of milk, and even serve a purpose as "bookends" with some ice cream held in middle.
 The following recipe is adapted from one found on 101 Cookbooks 

2 3/4 cup rolled oats (do not use instant)
1 cup whole wheat flour
2/3 cup wheat bran or wheat germ
1 teaspoon baking soda
1 1/2 teaspoon baking powder
1 teaspoon fine grain sea salt
1 cup unsalted butter
1 cup natural cane sugar or light brown sugar
1 cup dark brown sugar firmly packed
2 large eggs
2 teaspoon vanilla extract
10 oz semi-sweet chocolate chips/chunks**
**  the cookie image above has 4 oz white chocolate chips, 
4 oz sem-sweet chocolate and 2 oz toffee crunch candy

Preheat the oven to 350* with the racks placed in the middle of your oven and line two baking sheets with silpats or parchment paper.

In a medium bowl, combine the dry ingredients - oats, whole wheat flour, wheat germ, baking soda, baking powder and salt.  Set aside.

Using either a stand or hand mixer, cream the butter until light and fluffy.  Beat in the sugar, scrape down the sides of the bowl a few times as you proceed.  Add the eggs, one at a time, then the vanilla, again scraping down the bowl a couple times.  Add the dry ingredients in a couple batches to the wet ingredients, mixing until everything comes together.  Then stir in your "anything and everything" additions making sure all is evenly mixed in.

Using a small ice-cream scoop, scoop out portioned cookies, placing on the baking sheet  at least 3-inches apart since the cookies will spread.  I find that 3 cookies across is a good number to work with. 

Bake for 15-minutes, rotating the pans half way.  They will become a nice golden brown .   Of course if you like your cookies crisper, try baking them a bit longer but keep an eye on them.  You don't want them getting too dark.


Saturday, July 14, 2012

Summer Roasted Fruit


I recently say a picture of a plate of roasted apricots each with a shiny, sugary glisten and an inviting dollop of Marscapone cheese.  I knew this was something I had to make and my bowl of nectarines and peaches were ready for their close up.
I will admit until recently I didn't own a classic cast-iron skillet, the ideal pan for this project.  Isn't a cast-iron pan a classic item to have in one's kitchen?  Back to my fruit.  My preference is to use peaches and nectarines, but plums and apricots would work as well.  You'll want to dip each "open front" fruit half in some sugar for the caramelizing and roast  bottom side down.  You could also grill the fruit which is just as delicious.  The fruit remains bottom side up while roasting, but if grilling is your preference, just give the fruit halves a quick turn while grilling so you can achieve some nice grill stripes on the open fronts.  My tip for slicing and removing the stone from the center is to  run your knife horizontally not vertically around the fruit and give a slight twist to separate.  The fruit halves are prettier, more rounded.  An added bonus to roasting or grilling stone fruit -- the center of each half becomes a natural "bowl," ideal for some cold ice cream to balance with the softness and warmth of the fruit.
The following a recipe adapted from Joy the Baker
Serves 4
4 peaches,  halved and stones removed - could also use plums or nectarines
2 tablespoons granulated sugar

Topping
1/2 cup marscarpone cheese
1 teaspoon honey
1 teaspoon chopped mint

Preheat broiler.  Place sugar in a shallow bowl.  Dip fruit halves in sugar and place in a oven safe pan.  Place dish under the broiler and bake for 3 to 4 minutes.  Keep an eye on the fruit, and carefully rotate the pan as necessary.  Sugar will melt, boil and begin to brown.  Remove from the oven and allow to cool slightly.

For the topping:
In a small bowl, mix honey into mascarpone cheese.  Place slightly cooled fruit on a plate.  Top with a dollop of mascarpone mixture, and a sprinkling of fresh mint and serve.


Tuesday, July 3, 2012

Mushroom- Shallot Quiche


Oyster, Cremini, Shitake, Enoki, Hen of the Wood, Baby Bella, Porcini, Trumpet, Chanterelle, Button, Portobella, the elusive Black Truffle, oh how I love the woodsy mushroom !  Nothing compliments the mushroom like fresh thyme and of course, butter! When I came across a recipe from the wonderful cookbook author Dorie Greenspan from a 2006 issue of Bon Appetit, I was like a little kid on Christmas  This Mushroom-Shallot Quiche is a classic. I did, however, make some slight changes... including using a mixture of AP flour and whole wheat flour for the crust, and swapping half & half for the heavy cream in the filling.  Since I do have a strong affinity for mushrooms, I couldn't use just one variety, I opted for Shitake and Button mushrooms.  Serve this as a light dinner with a green salad, portion out pieces and brown-bag it for lunch at work.  If you can, take the time to make your own crust, you won't be disappointed.
 Mushroom-Shallot Quiche
Bon Appetit / October 2006

Serves 6
Crust
1 1/2 Cup all purpose flour 
(I used 1 cup whole wheat flour and 1/2 cup all purpose)
1 tsp salt
1 tsp sugar
1/2 cup (1 stick) chilled, unsalted butter, cut into 1/2 inch pieces
1 large egg
1 tsp cold water

1 large egg white, lightly beaten

Filling
 1 1/2 tbs unsalted butter
1/3 cup chopped shallots ( 2 medium shallots)
1/2 pound mushrooms, cut into thin slices
5 tsp chopped fresh Thyme, divided

3/4 cup whipping cream (Half & Half or milk is fine)
2 large eggs
Pinch of salt
Pinch of ground black pepper
2 green onions (use both the white and green parts), thinly sliced
2 tbs grated Gruyere cheese

Monday, July 2, 2012

Summer Corn Salad


When the heat index is in the triple digits, do you really want to be in the kitchen?  You will once you learn how to make this quick and easy corn salad.  An ideal side served with anything, there is very little cooking involved with this recipe. You either steam or grill the corn, and then remove the kernels once it's cooled.  You really can't mess this up.  You can add additional vegetables  to the corn, toss with some olive oil and salt, and dig in!   My version is as follows:
Serves 4
4 ears fresh corn (you could use frozen in a pinch)
1 ripe avocado
1 pepper - red, yellow, orange, green -- whatever your favorite is
1 small red onion (optional)
  • Grill or steam the corn, and when at room temperature, remove the corn from the husk and place into a medium-sized bowl.
  • Cut the avocado  in half, and with your knife slice each half into diamond-like pieces.
  • Remove the seeds from the pepper, dice and add to the salad.
  • Dice the onion in small pieces and add to salad.
  • Toss with olive oil and salt and garnish with some fresh parsley.

Monday, June 25, 2012

Peach Cobbler Scones


I love to read other food blogs and I've noted a few of my favorites on my blog.  Recently Joy the Baker posted a great peach scone recipe, which had me tasting fresh peaches as I read it.  There is nothing like a juicy, ripe peach and this morning I made a mad dash to the local green market  near my home to search for some great peaches.   I obviously succeeded as you will note from the picture above.   This is a simple recipe.  You don't need to lug out the mixer or other "kitchen equipment."  All you need are some bowls, a large spoon and some baking sheets.  Like many of the recipes I post, I do like to make some tweaks and here I used both All Purpose and Whole Wheat Flour  (2 cups AP and 1 cup Whole Wheat).  When it comes to the fruit, I did stick with peaches but any other stone fruit such as nectarines, plums or apricots would be just as good.  You can even use different berries. Give this recipe a try, I don't think you'll be disappointed.  The scones are best when served warm with some butter or additional fruit preserve.


3 cups all-purpose flour
1/4 cup granulated sugar
3 tsp baking powder
1/2 tsp baking soda
3/4 tsp salt
 1/2 cup unsalted butter, cold and cut into pieces
1/4 cup vegetable shortening, also cold and cut into pieces
1 egg, beaten
3/4 cup cold buttermilk
1 tsp pure vanilla extract
1 ripe peach, thinly sliced
1/4 cup buttermilk, for brushing
2 tbs granulated sugar
3/4 tsp cinnamon

Preheat oven to 400* and place the oven racks in the center and on the top.  Line two baking sheet with parchment paper or a silpat and set aside.

In the bowl, sift together the flour, sugar, baking powder, baking soda and salt.
 Cut in the butter and shortening until the mixture resembles a coarse meal.  Use your hands the break up the butter and shortening into the dry ingredients.  The bits of butter and shortening should be the size of peas and flakes.
In a small bowl, add the beaten egg, the buttermilk and vanilla and mix with a fork.  Add the liquid to the flour-butter-shortening mixture all at once and stir to combine making a soft dough.  Turn dough onto a floured board or counter and kneed about 15x. [If the butter is too warm or soft, put the dough into a bowl, cover with plastic wrap and let rest in the fridge for 15 minutes.] Shape the dough into a disk and roll out to less than 1/2 inch thick.  The dough should be a bit thinner than biscuit dough.
Brush half of the rolled dough with buttermilk and arrange the peach slices in a single layer, across the buttermilk side of the dough.  Spinkle with half of the cinnamon sugar mixture.  Carefully fold the "dry" half of the dough over the peaches and press the edges of the dough in, creating a rectangle shape.  Using the floured knife, slice dough into eight even pieces.  Place the dough on the prepared baking sheets, leaving room between each scone. [If the dough has become warm or feels mushy, place the baking sheets in the fridge for 20 minutes to chill.
  Brush each scone top with buttermilk, and sprinkly with remaining cinnamon sugar.  Bake the scone for 15-18 minutes, until golden brown and cooked through.  Remove from the oven and cool for 15 minutes before serving.  


Thursday, June 21, 2012

My Favorite Blueberry Muffin

I recently took my niece to one of my favorite places, the Green Market at Union Square, to show her the fantastic offerings of fresh vegetables, fruits, and baked treats as well as the plethora of flowers and plants.    We wandered through the many stalls, sampled some tasty items and then got down to the business of shopping.  Ninety minutes later,  we were heading home with some wonderful Swiss Chard, bags of fresh  peas and mushrooms, pints of blueberries and fresh strawberries, a window basket of herbs, and one potted deep pink geranium.  My niece didn't seem to be interested in the vegetables; instead, she wanted to make cupcakes with the fruit.  While we didn't make cupcakes we did make my favorite blueberry muffin, or in this instance, my favorite blueberry-strawberry muffin.  The following recipe is taken from a wonderful book aptly called Muffins: Sixty Sweet and Savory Recipes...from Old Favorites to New by Elizabeth Alston. 


The Best Blueberry Muffins
Yields: 12 Regular Muffins
1/2 cup (1 stick) butter, at room temperature
1 cup granulated sugar, or slightly less depending on the tartness of the berries
2 large eggs
1 teaspoon vanilla extract
2 teaspoons  baking powder
1/4 teaspoon salt
2 1/2 cups blueberries (mash 1/2 cup with a fork)**
2 cups all-purpose flour (if you prefer whole wheat flour, you can adjust the ratio)
1/2 cup milk
1 tablespoon sugar mixed with 1/4 teaspoon ground nutmeg (I also add a dash or two of cinnamon)
** if you do more than one berry, adjust i.e. 1 cup of each berry and 1/4 cup of each mashed

Heat oven to 375 F.  Grease 12 regular muffin cups.
In a medium bowl or mixer with the paddle, beat butter until creamy then add sugar, continuing to beat until pale and fluffy.  Beat in one egg at a time.  Beat in vanilla, baking powder and salt.
Mix the mashed berries into batter.
Fold in half of the flour, then half of the milk and mix.  Add the remaining flour and milk.  Fold in the remaining berries.
Scoop batter into the muffin cups (I like to use an ice-cream scoop so each cup measures the same).
Sprinkle each muffin with the sugar-nutmeg mixture.
Bake 25-30 minutes or until golden brown.  Let the muffins cool at least 30-minuts in the pan before removing.

I wrap each muffin (in their muffin cup) with plastic and toss into the freezer.  They're great to grab and go!


Wednesday, June 6, 2012

A WARM WEATHER FAVORITE, GAZPACHO


There is something satisfying in knowing that if I open my fridge, and if I've done a good grocery run,  I can make something that is filled with wonderful color, flavor and texture, and will make friends smile. Nothing screams warmer weather has arrived than a really good Gazpacho and the one I make is an absolute favorite!  And keeping with my mantra of "easy is good," this recipe is quickly made in the food processor. I just rough cut the ingredients and off to the processor they go...
Note: Coming soon will be more easy recipes  -- a easy corn salad, home made fruit and herb butters, Carrot Cake Cupcakes with Lemon Frosting, Blueberry Muffins and more...

1/2 Bermuda onion peeled and quartered
1 1/2 firm, medium cucumbers peeled
2 small green pepper -- I like to mix it up and also use red, orange and yellow peppers
6 medium-large tomatoes, peeled (I usually don't peel)
5 large garlic cloves
1 cup  tomato juice -- I like to use V-8 juice 
1/2 olive oil
3/4 tsp chili powder or some dashes of Tabasco (amount depends on how much kick you want)
1 tbs Kosher salt

With the metal blade in the food processor, add the onion and pulse on and off until finely chopped.  Place chopped onion into a large bowl.  Repeat with the cucumbers and peppers, adding each to the bowl with the onions.  Process 5 tomatoes until evenly chopped, transfer to the bowl with other ingredients.  Process the remaining tomato with the garlic, tomato juice, olive oil and chili powder until you have a smooth liquid.  Add to the bowl of other veggies, chill covered,  Before serving, salt to taste, and if too thick, add a bit more tomato or V-8 juice.
Makes approximately 1 1/2 quarts.
Recipe adapted from Barbara Kafka.


Tuesday, May 22, 2012

Olive Oil Cupcakes

Olive Oil Cupcakes
To me the word "rustic" is comforting and when rustic is used to describe a recipe, it catches my attention.   My mother recently mentioned an Olive Oil cake recipe from Rustic Italian Food that combines both sweet and savory elements.  She knew I would probably be intrigued and she kept saying how much my father loved it.   An email later, and one printed recipe, and it was my turn to see what this cake was all about.  OK, yes it does sound "wet" and the batter is on the loose side but this cake is really good.  Mother really does know best!  The cake has a moist, spongy texture with a subtle layering of  citrus flavorIt's an idea treat for spring and summer.  The recipe calls for a spring form pan but I wanted to test the waters and made the cake as cupcakes,  I discovered, either way, it tastes great. You can decide which way you want to make them.   The directions below are for the spring form pan

2 cups All Purpose flour
1/2 tsp Baking Powder
1/2 tsp Baking Soda
Pinch of fine Sea Salt
3 Eggs
2 1/2 cups Granulated Sugar
1 1/2 cups Olive Oil
1 1/2 cups Whole Milk
Grated Zest of 3 Oranges
 Confectioners Sugar for dusting

Preheat oven to 350*.  Line a lower rack oven with aluminum foil in case the cake leaks out some batter. (I used a cookie sheet)

Coat a 10-inch spring form pan with cooking spray and cut a piece of parchment paper to fit the pan and come up about 1/2 inch on the sides.  Fit the parchment into the pan and spray the parchment.

Whisk together the flour, baking powder, baking soda and salt in a medium bowl.  In a large bowl, whisk the eggs and granulated sugar together.

Whisk in the oil, milk and orange zest.  Add the dry ingredients and stir until blended.

Pour the batter into the prepared pan and bake on the middle rack until a toothpick inserted into to the center comes out clean, 45-55 minutes.  The cake will be very moist.  Cool it in the pan on a wire rack for 10 minutes.  Run a knife around the edge to loosen the pan and remove the spring form sides.  Let cool completely then dust with confectioners sugar.

The cake can sit at room temp, loosely covered, for up to 3 days.  Cut slices as you want.


Sunday, March 18, 2012

A Cookie and a Smile

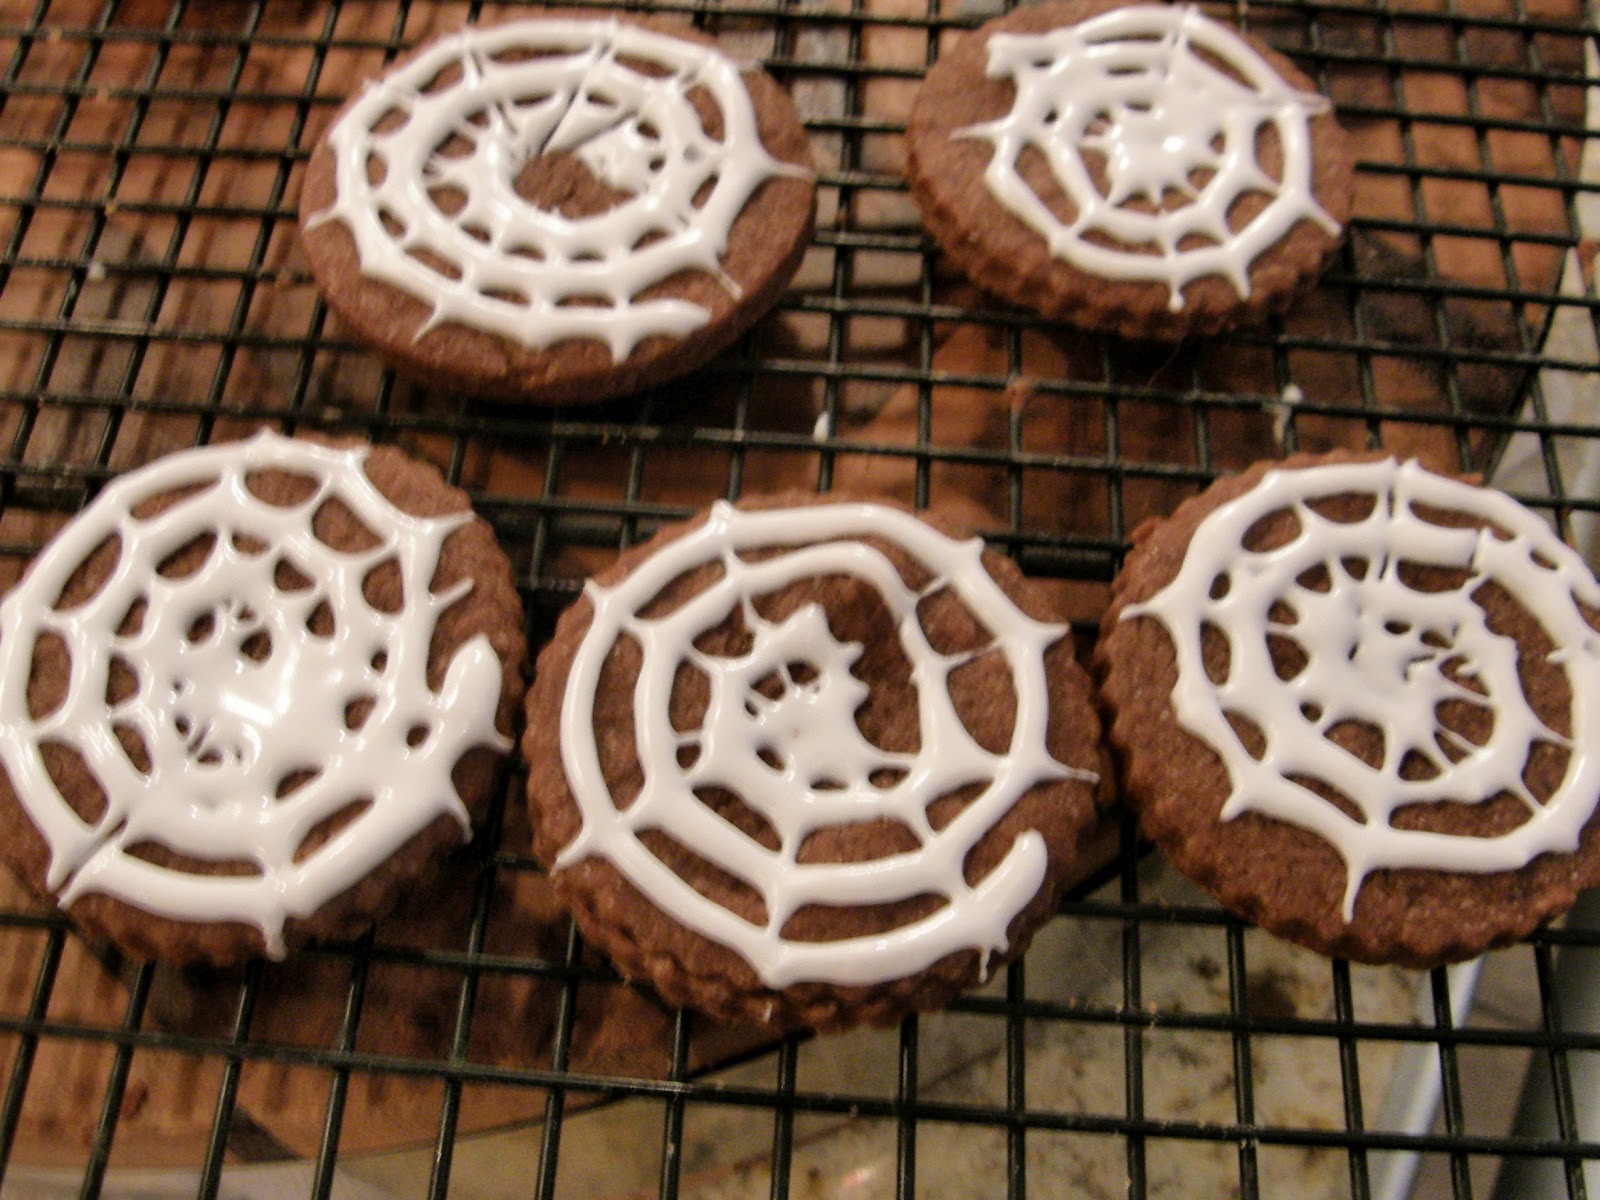
My niece recently came over for an afternoon with a specific plan in mind for our time together.  Under her arm she had a copy of Fairy Cooking, a cookbook I didn't know.  She pointed out the cookies she said we were going to make -- Chocolate Cobweb Cookies.  Come on, we all love baking cookies but making them with a child makes them taste even better.
A fantastically simple recipe that requires equipment we all have...our hands. This is a keeper for Halloween. The recipe makes 18 cookies:

1 1/3 cups All Purpose Flour
3 tbs Cocoa Powder
1/2 cup (1 stick) Butter, cold cut into pieces
2 tbs Milk
White Writing Icing (ok, I fess up, I bought the stuff in the tube at the supermarket)
2 cookie sheets lined with a silpat
Round Cookie Cutters
1 Toothpick

Preheat you oven to 350*
  • Put the flour and cocoa powder in a large bowl.  Add the cold butter, then rub the mixture together with your fingers

  •  When the mixture looks like breadcrumbs, stir in the sugar.  Sprinkle the milk over the mixtures and give everything a mix.
  • Continue to mix until everything sticks together and you can form into a ball of dough.
  •  Wrap the dough in cling wrap and place in your fridge for at least 20 minutes.
  • Sprinkle some flour on a clean surface and roll out the dough until 1/4-inch thick
  •  Using a round cookie cutter, cut out circles and place on the baking sheets
  • Bake for 12-15 minutes, then remove from the oven and leave the cookies on the sheets for 5-minutes to cool before moving them to a wire rack to cool. 
  • With the writing icing, draw a spiral on each cookie, starting in the middle and working out toward the edge. Then, with a toothpick, drag the icing from the middle to make a cob-web.  Let the icing set.

Sunday, March 4, 2012

Chocolate Oh Chocolate


There are very few people I know who truly do not like chocolate.  In fact most people I know are quite the opposite, they love the sweet stuff.  Now that I have a niece, I keep  Nestle's Nesquik on hand.   It's fun to mix that classic powder into a glass of cold milk and go down the road of childhood memories.  There isn't anything that a nibble or sip of chocolate won't make better.  My preference is dark chocolate but I certainly won't turn down other varieties.  Chocolate goes with just about anything. I love it when chocolate is used as a base in other foods or drinks to enhance flavor.  Mexican Hot Chocolate delights the taste buds with its hints of chili and other spices.  And, of course there is Nutella, the chocolate-hazelnut creamy spread that you just want to eat right out of the jar!  The wonderful Patricia Polacco, bestselling children's author & illustrator shares her family recipe for Chocolate Cake in the classic Thundercake.  The wonderful surprise is the addition of pureed tomatoes which intensifies the cake.

The enhancement in this chocolate muffin recipe is the actual muffin.  It's lighter and more of a sponge-cake texture.  I actually used half cake flour and half all-purpose flour.  Also, I love that the recipe calls for applesauce, buttermilk, and egg whites.  That cuts down on the fat that butter and oil would add. The applesauce adds a sweet taste and the buttermilk a nice tang. The actual recipe makes 24 mini muffins, but in this instance, I chose to make 12 "regular sized" muffins.  Great to bring to work, save for a snack, or eat whenever...!  If you have the willpower not to eat them all right a way the muffins can be wrapped tightly and kept in the freezer.

1/2 cup canola oil
2 large egg whites
1 1/2 teaspoons vanilla extract
3/4 cup sugar or Splenda which can be used measure for measure
1/2 cup unsweetened applesauce
3/4 cup low-fat buttermilk
2 cups all-purpose flour (I used 1 cup cake flour (Softasilk) and 1 cup all-purpose flour)
1/2 cup cocoa powder (Dutch process)
1/4 cup dark brown sugar
1 1/2 teaspoon baking powder
1/2 teaspoon baking soda
1/2 cup chocolate chips *

Preheat oven to 400*.  Spray a cupcake or muffin tray and line with paper liners

In a medium bowl, whisk together the first six (6) ingredients, and set aside

In another bowl, large in size, combine the remaining six (6) ingredients and stir.  Making a well in the center of the dry ingredients, and stir in the wet mixture.  Make sure all ingredients are combined and moist.

Using an ice-cream scoop to evenly distribute the  batter into the cupcake tray and liners.  Each paper liner should be approximately 2/3 filled.

Bake for 15-minutes or until the center springs back lightly when touched.  Cool for 5 minutes.

** I like to be creative with the last ingredient -- I will use white chocolate chips, Peanut Butter Chips, a mix of semi-sweet and dark, or even Heath Bar chips. 

Adapted from the Two-Bite Double Chocolate Muffin by Marlene Koch


Monday, February 20, 2012

Cupcakemania!

I love cupcakes and when you combine the ideal-sized treat with a favorite comfort food, you have something you want to share -- Mac N' Cheese cupcakes! I'd love to claim this idea as mine but I can't. Instead, I thank all the different blogs and recipes where the savory cupcake has been highlighted. This past weekend, I also made a turkey meatloaf into the single cupcake portions.  Not as delicious looking as the Mac n' Cheese cupcake, but it's also a great portable idea for packing lunch, etc.  Jumping on the bandwagon with the savory cupcake, my Mac N' Cheese cupcake is adapted from culinary nutritionist and bestselling cookbook author Marlene Koch.

Mac N' Cheese Cupcake

Makes 12 cupcakes

8 oz elbow macaroni
2 cups sharp cheddar cheese (reduced fat)
2 tsp cornstarch
1 cup lowfat milk (I used 3/4 c lowfat milk and 1/4 c fat-free Half & Half)
1 large egg
1/2 tsp garlic salt (I replaced with 1/4 tsp Dry Mustard)
1/2 cup Panko Breadcrumbs 
2 tsp melted butter (I used a butter blended with fresh Thyme)
  1.  Preheat the oven to 400*. Place paper or foil cupcake liners in a 12-cup cupcake /muffin tin and spray lightly with non-stick baking spray
  2. Cook the macaroni per the directions.  Drain and return to the pot.  Add the cheese and stir until almost melted.
  3. In a bowl, whisk together the cornstarch and milk. Add the egg and whisk until smooth. Pour the milk mixture over the macaroni and mix well.
  4. In a small bowl combine the butter and the breadcrumbs.  Scoop the macaroni mixture evenly into the cupcake liners - note: the mixture will seem wet but it will set as it bakes.  Sprinkle breadcrumbs on each cupcake and bake for 20 minutes.

Monday, February 13, 2012

A Perfect Canvas to Build Upon

My trainer came over for dinner the other night.  The reason was to celebrate his engagement, but to also thank him for his patience with me, his friendship and to wish him well as he gets ready to move back to the West Coast. While figuring out what I wanted to make for dinner, I thought about our "relationship."  As a trainer he sees and works with many different people, and to him his clients are individual canvases, each unique and (usually) a blank slate when he began with each of us.  The idea of a blank canvas got me thinking that cooking is a blank canvas which we build upon.  Like building layers of muscle for healthy body, a food canvas is built upon layers of flavor, sometime bold, sometimes subtle, but always beginning with a blank canvas.
That brings me to what I made; something simple with layered flavors to give each bite the perfect sensation.  The Lemon Chicken recipe from Simply Recipes.com is ideal.  Chicken is the perfect canvas for building flavor, and truth be told, I love anything that has lemon in the recipe.  Here you have pieces of chicken hanging out in a bath of lemon juice, lemon zest chopped garlic, and great herbs such as Rosemary and Thyme.  After a great soak in the marinade, the chicken moves to a baking pan, is placed in the over with a brushing of butter. The end result is a fantastic dish that you'll come back to time and time again.
photo courtesy SimplyRecipes.com

Friday, February 10, 2012

The Grab N' Go Oat Bar - A Perfect Trifecta


If you’re reading this blog, you love food.  You love to cook and you love to try new recipes. I found a recipe that’s an ideal trifecta: fantastic taste, a great portable breakfast or afternoon treat, and it’s good for you!  Here’s the kicker, the best part of this recipe – it’s low in calories, fat and sugar and has enormous taste!  It’s the Grab N’ Go Oat Bar by Marlene Koch (pronounced Cook) who, if you aren’t familiar with Marlene Koch, quite simply she is “the magician in the kitchen!”
Now to be honest, I’m working on Marlene’s upcoming cookbook Eat More of What You Love which coming in April 2012, so when the early copy landed on my desk, it was my obligation to begin testing some of the recipes and its two thumbs up!  This was the first recipe tested not only was simple, I used just a large mixing bowl and a medium/large measuring cup for the wet and dry element –my friend was at my apartment when I pulled the pan out of the oven and kept pestering me, “when can I taste them?” .. Always a good sign!   When I began to assemble my ingredients, I noted Marlene’s use of no-calorie sweetener.  I normally only bake with “the real stuff” but decided to try the Splenda Baking Blend which is Sucralose and Sugar combined and reduced the amount. I could now become a convert for future baking recipes.  Most of us have the ingredients for this recipe on hand; OK, I didn’t have the prune puree baby food (the only baby food I have is sweet potato and that’s for my dog, but that’s another blog post…) but once I made the bars, I began to think wouldn’t it be fun to use peach puree, almonds and dried dates, or apple-pear puree, pistachios and dried cherries?  Of course I was right on target because Marlene encourages you to mix n’ match fruit purees with different nuts and dried fruit.  Wow – who doesn’t like to have some creative fun-time in the kitchen?!   My early copy of this cookbook has dog-eared pages noting the other recipes I can’t wait to try.  I encourage all to make this recipe and of course to buy the book!

Makes 12 Servings
2 cups quick oats
1 cup white whole wheat flour ( I used Whole Wheat Flour)
3 / 4 cup granulated no-calorie sweetener (like Splendid)
3 tablespoons of brown sugar
3 / 4 teaspoon baking soda
1 /2 teaspoon baking powder
1 /4 cup dried cranberries, chopped finely
1 /4 cup chopped walnuts
1 / 4 cup prune puree (or 3.5 ounce package baby food prunes)
3 tablespoons canola oil
3 egg whites
1 tablespoon molasses
1 1 /2 teaspoons vanilla extract

  1. Pre-heat oven to 350° F. Lightly spray a 9 x 9-inch baking pan with non-stick cooking spray.
  2. In a very large bowl, mix together the first 9 ingredients (oats through walnuts). Set aside. In a medium bowl, whisk together the remaining 5 ingredients (prunes through vanilla).  Pour the prune mixture over the dry ingredients.  Mix with a spoon until all the ingredients are combined.  Batter will be sticky.
  3. Spread batter into the baking pan and bake for 12-minutes.  Do not overbake.  Set baking pan on rack to cool.  Cut into 12 bars.